The holidays cost big bucks, bigger bucks than some out-of-work elves and cash-strapped consumers can afford.
But if you want to pay for Christmas, Chanukah or Kwanzaa gifts this December, especially during difficult financial times, now is the time to plan ahead, now is the time to turn summer trash into Christmas cash.
I sometimes start as early as May or June, making quilted Christmas ornaments, sometimes to give as gifts, other times to sell, raising the funds to purchase presents for my partner, perhaps iTunes for my nephews, a mirror for my mom.
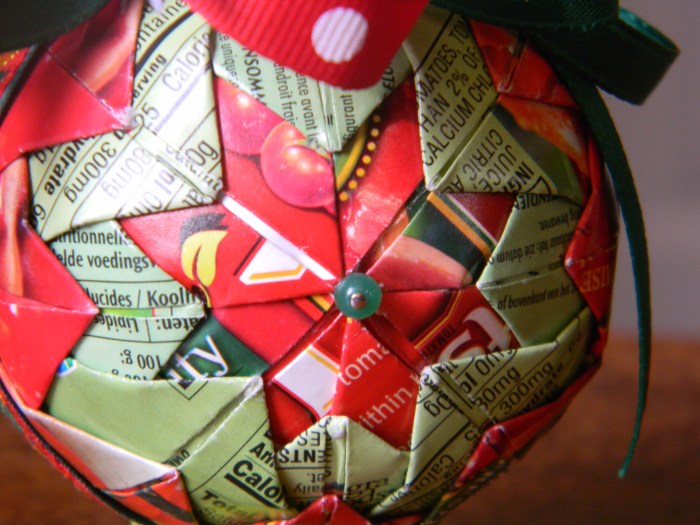
These tree ornaments can be made from found fabric and repurposed paper—skirts to shirts, magazines to maps.
What you will need:
–found fabric (40 squares per ornament, 2 inches each) OR
–repurposed paper from books, maps, or newspapers (40 squares per ornament, 2 inches each)
–straight pins (approximately 200-210 per ornament)
–Styrofoam balls (2.5 inches each)
–ribbon (5/8 inch, ½ inch, and ¼ inch)
–beads
–scissors
–ruler
Follow these steps:
- Cut fabric and/or paper into 2 inch squares. You will need 40 squares per ornament.
- Pierce center of first square with pin.
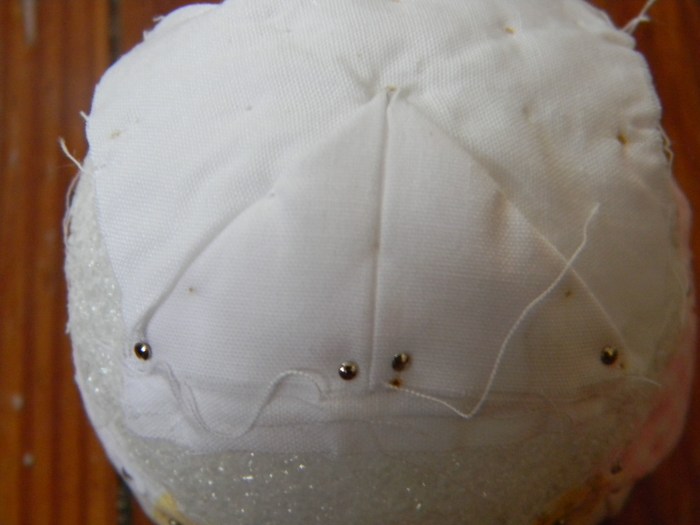
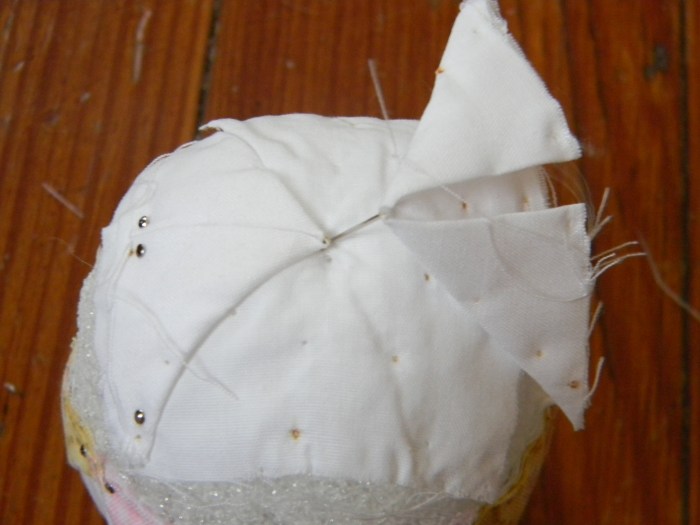
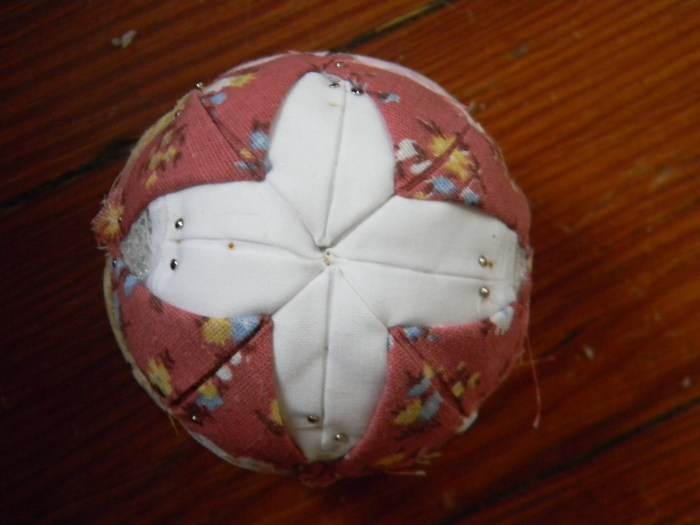
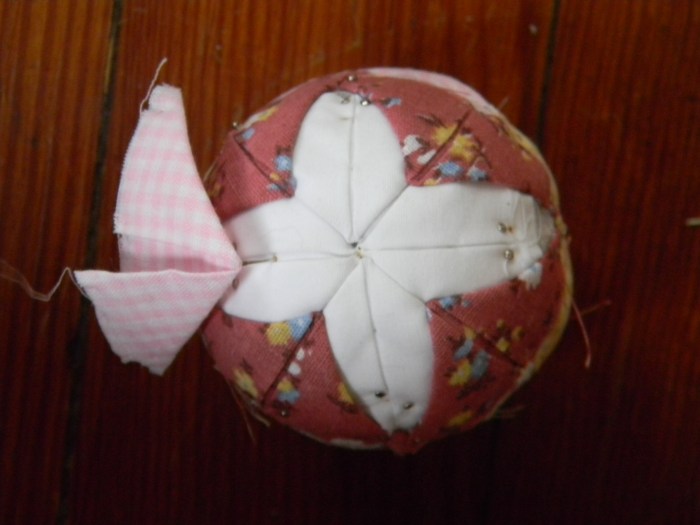
- Fold fabric/paper as shown in photos below and attach to ball.
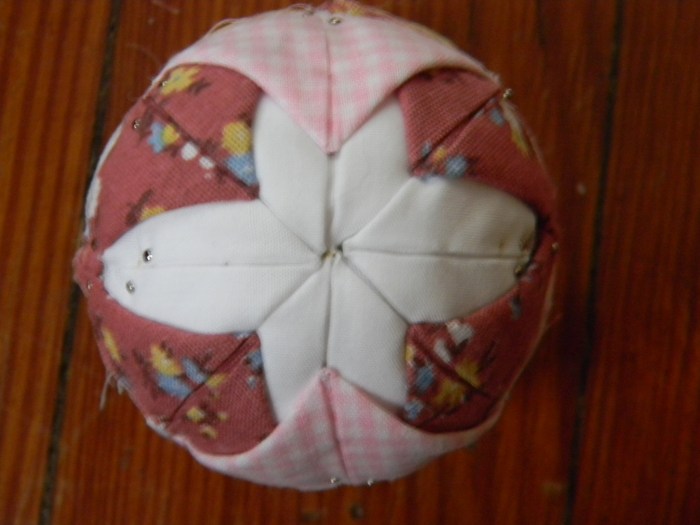
- Add fabric/paper squares until you have 4 in the first circle, 8 in the next, and 8 in the last.
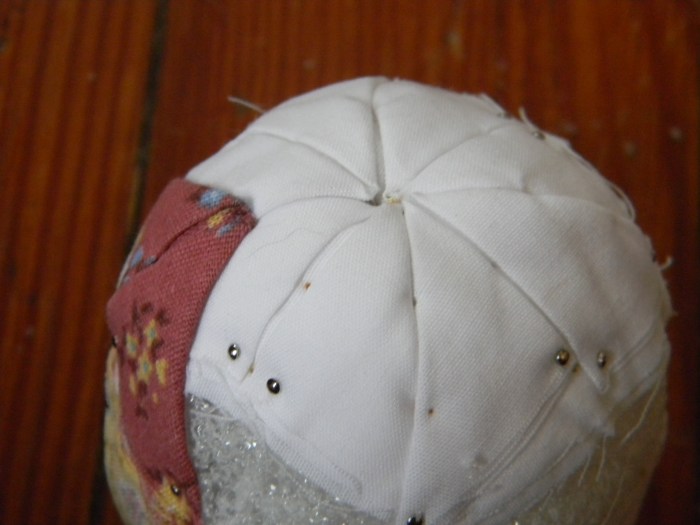
add the first triangle of the next set between triangles of the first, inserting the top pin about 1/4 inch from the center
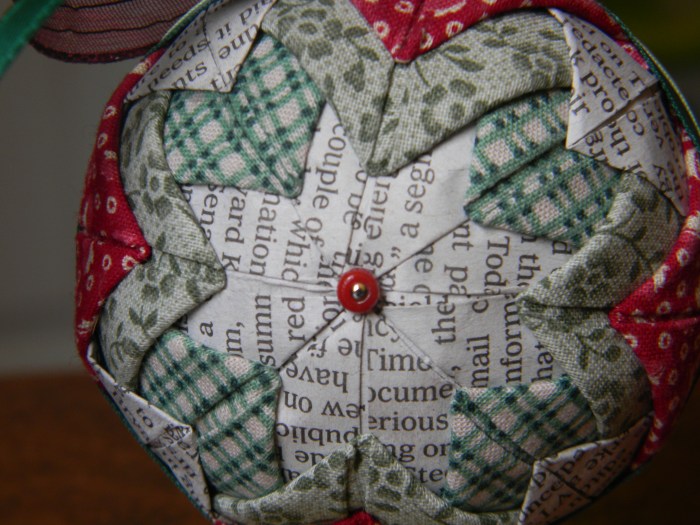
- Repeat steps 2-4 on the opposite side of the ball, again adding 4 squares in the first circle, followed by 8 each in the following 2 circles, until fabric/paper squares nearly meet in the middle and you can see only a narrow band of Styrofoam circling the center of the ball. (See images below.)
- Pin 8 inch strip of ribbon (5/8 inch wide) around the middle of the ball to cover pins.
- Add optional ¼ ribbon over the 5/8 inch ribbon to create layered effect and pin in place.
- Attach ribbon to form bow on top in desired pattern and color. Secure with pins. I usually use two colors, applied in opposite directions and crossed in the center.
- Secure loop for hanging with decorative beads and pin.
- Pin optional decorative beads in the center of the smallest star on either side of ornament.
(Note: I would make a number of ornaments with fabric before proceeding to paper, which is more difficult to manage.)
Will you rethink your ethic of giving this Christmas? Do you have a holiday ecology?







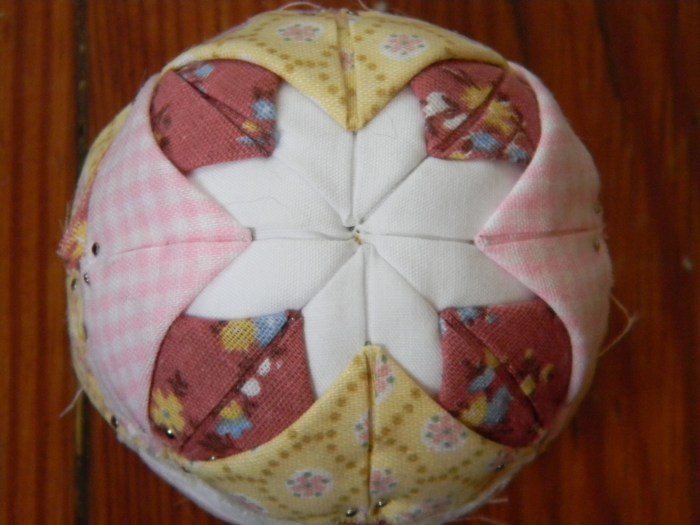


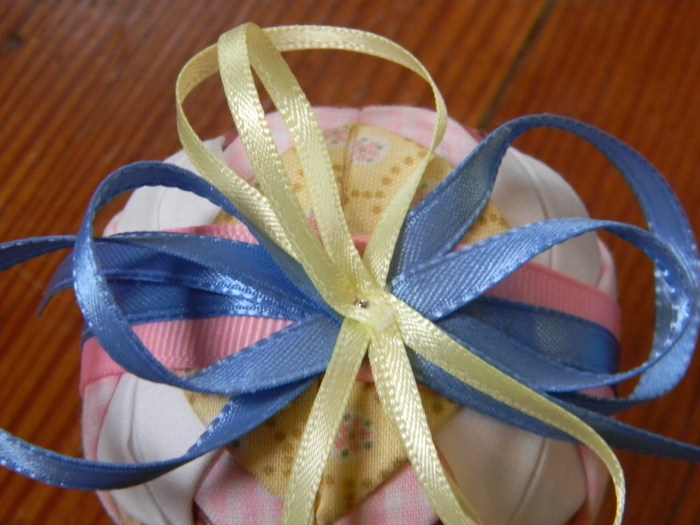

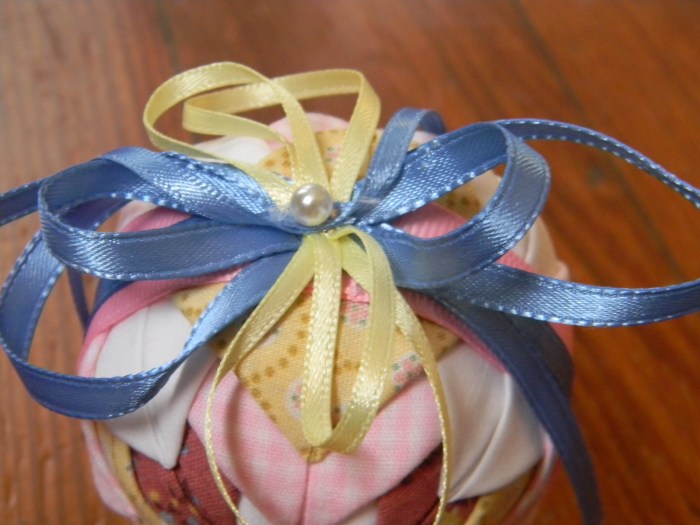


I have a whole room full of fabric left over from the days when I had my shop. I could make hundreds of these! We don’t worry much about Christmas gifts in our family. We just have lunch with whoever is in town and leave it at that.
LikeLike
You are a wise women, Deb! Doing away with gifts altogether is a great idea! How fun to have so much fabric, though. I imagine Christmas is lovely in your small town! Happy holidays way too early!
LikeLike
OMG. I love these. If you ever come to South Africa, please bring one for me, preferably made from a map of Africa. I’ll pay extra 🙂
Great job putting together this beautiful post, too. Must have been a lot of work with all the pics. It really should be Freshly Pressed. (Do you hear me, WordPress? Look here!)
LikeLike
You are so sweet, Heather. Your comment has helped make my day. I have been working on an ornament that includes a map of Africa. I will share photos later in the week. If there’s a way to get to you, I’ll send it, or save it for you sometime you are back here. I’m so pleased you liked the ornaments!
LikeLike
Kathy the crafty pants! I love this idea. I’m a little nervous to give craft projects another go after the Pimp Stick Box fiasco, but I might just try this one. (read: I’ll be sending you the doctor’s bill!)
LikeLike
I know–just call me Krafty Kathy! But you really should try making one. It’s fun and your family will love them! But be careful with the pins! Ha, ha!
LikeLike
These are insanely beautiful but– to the woman who is afraid of straight pins and anything resembling sewing– look INSANELY time consuming!! Maybe I’m all tuckered out from work, but these ornaments look like something I’d cherish to receive but refuse to make and give myself. 😛 Bless you for making them as gifts for the ones you love. They are precious! (I especially like the paper ones.)
LikeLike
Thanks so much, Dana! I’m thirilled that you love my ornaments. They are a bit labor intensive, but they’re well worth the work! Hope your week goes well, my friend!
LikeLike
Quite a clever idea.
LikeLike
Thanks so much, Charles! Glad you like them——————————
LikeLike
These are really pretty and such an eco-friendly gift.
I make either a stack of greeting cards tied in a ribbon or tiny collages in 1/2 of an Altoids tin. I stick a magnet on the back and instant personal fridge magnet. And I like to make at least one nice collage—I think it’s my sister’s turn this year.
LikeLike
Thanks, Sandy! They’re eco-friendly except for those damn Styrofoam balls. Wish I knew of an alternative. If anyone out there knows of one, let me know, PLEASE! Your gifts sound lovely. I love you Altoids tin idaea!
LikeLike
Heather is right, this post should be FP’ed for sure! What lovely work, both the making of the ornaments as well as putting together such a riveting blog post about it! I was wondering where I could get my hands on styrofoam balls….
Craft projects are so much fun, the more painstaking the better, and I love the look of patchwork…it’s so typically American (I think!)
For years I made layettes for new born babies (fancy matching stuff), and when I stopped doing that I had lots of pastel fabrics left….so naturally I thought of cutting em up into squares and stitching them into a patch-worked bedspread or some such thing. Hope I finish it some day!
So proud of you for being so eco-friendly my friend! Absolutely love your work! Kudos! 🙂
LikeLike
Thanks so much, Munira! I’m glad you like the ornaments. And how fun that you too think it should be FP-ed! You all are great!
Here in the US you can buy Styrofoam balls at craft stores. Don’t know how many of those there are in Pakistan. You might try shopping for them online and having them shipped to you. That might be easiest.
Glad also you appreciate my eco-friendly approach–but it would be more so without the Styrofoam. Just don’t know of another option. Alas!
LikeLike
I’m a guy, so admittedly my eyes sort of glazed over here – I’m not exactly the “crafty” type – but I do like the end result. These would make fun gifts without setting you back an arm and a leg, that’s for sure!
LikeLike
I understand, Mark! I do the same with anything sports-related. What can I say? But, yes, they are a great gift that most women in your life will appreciate.
LikeLike
I love this. I wish I had the talent, patience, and time for this project. Unfortunately, I’m not very crafty with my hands.
Beautifully done, Kathy. 🙂
LikeLike
Ah, but you have one hell of an eye, Robin! Your photos rock! I’m so pleased you like my ornaments———————–
LikeLike
I guess I shouldn`t read from most recent back? You should make a mint! Of course I want one….
LikeLike
Emily, I’ll send you one for a Chritstmas gift. Pick one and I’ll pass it on to the Nose—————- Big hugs, my friend!
LikeLike
Wow! Even with your beautiful step-by-step instructions and photos, mine would never look like this . . . 😦
Have you ever thought of turning your artistic talent and flair for crafts into a business – with you in the role of designer?
LikeLike
Actually, I’d love to do that. I’ve sold the ornaments in the past and plan to it again this year. It just takes such an enormous amount of time to make each one, it’s hard to make an amount of money that seems worth the effort. In other words, folks often can’t or won’t pay the amount I’d like to charge to make my effort worth the time, if that makes sense.
LikeLike
I love the balls! Have made some with fabric but those with paper are very special. Great to meet someone who thinks the way I do.
LikeLike
How fun, Estie. I didn’t know you did crafts. And I didn’t know you had a blog. I will check it out! I love your posts on Lisa’s blog! I’m glad we think alike!
LikeLike
Guest blogger only!
LikeLike
I know. I found out once I tried to click on the link to what I thought was your blog. I guess you have to sign up for one to get a WordPress ID. Oh, well. I’ll enjoy you on Lisa’s blog!
LikeLike
Pingback: Read this . . . | Notes from Africa
Thanks so much, Lisa!
LikeLike
Hi, came over for a visit from Lisa’s blog and was not disappointed! What gorgeous ornaments and such clever ideas with paper and fabric. I love the quilted effect and I will bookmark this. If I finish one, I’ll let you know. Thank you for your very hard work on this…quite a gem of a post!
LikeLike
Thanks so much for reading, Georgette! I hope you do try to make an ornament. I’d love to know how it goes for you. Just be patient. It may take some practice–at least it did for me. I look forward to checking out your blog!
LikeLike
Pingback: Travels with Dogs, When Blogging Buddies Meet, Driving Toward Irene, and Happy Feet « Woman Wielding Words